
1August 2026
If you’re a homeowner in Mississauga wondering what professional caulking should cost in 2026, you’re not alone. Prices you see online often quote national averages or outdated numbers that don’t reflect local labour rates, condo vs. detached home realities, or the actual prep work involved. As a Mississauga-based handyman who handles caulking, grout repair, and small bathroom refreshes weekly, I’ll break down what you can realistically expect to pay right now, what drives the price up or down, and when it’s worth hiring a pro instead of DIY.
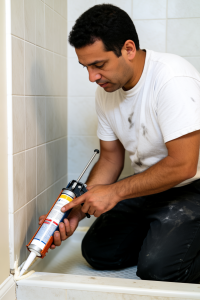
Typical Caulking Prices in Mississauga (Mid‑2026)
Most residential caulking jobs in Mississauga fall into a few common categories. These are rough ranges based on current market rates and the kind of work I quote and perform regularly.
Bathroom Caulking Costs
-
Standard bathtub or shower surround re‑caulking (remove old caulk, clean, apply new silicone): $200–$450
-
Most straightforward jobs land around $250–$350
-
Jobs with heavy mold, multiple layers of old silicone, or complex shower panels can push to $400–$500+
Behind the scenes, this usually works out to roughly $60–$110/hour in labour, but many handymen (myself included) prefer fixed project pricing so you know the total upfront instead of watching the clock.
Kitchen and Sink Caulking
-
Kitchen sink and small backsplash areas: typically $120–$250, depending on length, access around the faucet, and whether old caulk needs full removal
-
Larger kitchen perimeter caulking (where countertops meet walls) can run higher if there’s significant prep or color‑matching involved
Whole‑Home or Perimeter Caulking
-
Main‑floor perimeter sealing (windows, doors, baseboards, trim): commonly $700–$1,200+
-
Price depends heavily on linear footage, number of windows/doors, interior vs. exterior sealants, and whether any trim or drywall needs spot repairs first
These ranges assume a professional using appropriate sealants (mildew‑resistant bathroom silicone, paintable acrylic for interior trim, weather‑resistant sealant for exteriors) and doing proper surface prep, not just squeezing a new bead over old material.
What Actually Drives the Price Up or Down?
Two bathrooms can look identical online and end up with very different quotes. From my experience in Mississauga condos and homes, these are the main factors that move a job from the low end to the high end of the range.
1. Removal and Cleanup of Existing Caulk
This is usually the biggest cost driver. A simple re‑caulk where the old silicone is still in decent shape is much faster than a job with:
-
Years of buildup and multiple layers of old silicone
-
Heavy mold or soap scum embedded in the old bead
-
Previous “patches” over failing caulk that now need full removal
Proper removal takes time because new caulk won’t adhere well if the surface isn’t completely clean and dry. A bathroom that looks similar at first glance can easily take twice as long if the old material is stubborn.
2. Condition of the Area Behind the Caulk
Once the old caulk comes out, you sometimes discover:
-
Loose or cracked grout
-
Water‑damaged drywall
-
Rotted or soft trim
-
Gaps larger than expected
Caulking should be the final step, not a band‑aid over a damaged surface. Any repairs needed before sealing will increase labour and materials, but they’re essential for a long‑lasting result.
3. Accessibility and Working Conditions
Tight spaces and awkward layouts slow the work down. Examples I see regularly in Mississauga:
-
Behind toilets and under vanity overhangs
-
Oversized walk‑in showers with multiple niches, benches, and glass panels
-
High windows, stairwells, or areas crowded with fixtures
The difference between a standard tub surround and a custom shower with lots of corners and transitions can be significant, even though both are technically “bathroom caulking.”
4. Size and Total Linear Footage
Many customers focus on the number of rooms, but contractors think in linear feet. A kitchen sink might only need 10–20 feet of caulking, while a main‑floor perimeter with windows, doors, baseboards, and trim can easily be several hundred feet. More footage means:
-
More time removing old caulk
-
More masking and surface prep
-
More application and finishing time
That’s why a “whole main floor” job is priced very differently from a single bathroom.
5. Material and Finish Requirements
Basic white silicone is usually the most economical option. Costs increase when customers want:
-
Premium commercial‑grade or stone‑safe sealants
-
Color‑matched products
-
Clear architectural sealants
-
Higher‑end mildew‑resistant formulations
-
Extra‑clean cosmetic finishes for highly visible areas
These materials aren’t dramatically more expensive by themselves, but they often require more careful application and finishing, which shows up in the labour time.
If I had to narrow it down to the top three reasons a $250 caulking job becomes a $500+ job, they would be:
-
Extensive old caulk and mold removal
-
Hidden repairs discovered during prep
-
Large footage or difficult access
Those three factors account for the majority of price differences I see on residential caulking jobs in Mississauga.
Real‑World Examples From Mississauga Homes and Condos
To make these numbers feel less abstract, here are two realistic, anonymized examples that reflect the kinds of jobs I handle around Mississauga in 2025–2026.
Case Study #1: Condo Near Square One – “Simple Re‑Caulk Turned Into a Restoration Job”
Property type: High‑rise condo near Square One
Job scope: Master bathroom bathtub surround and glass shower enclosure re‑caulking
What the customer expected:
A straightforward re‑caulk because the existing silicone was discolored and peeling.
What we found:
-
Multiple layers of old silicone from previous repairs
-
Significant mold growth behind the existing caulk
-
Several grout joints that had cracked and separated
-
Areas that remained damp after removal, indicating long‑term moisture exposure
Work performed:
-
Complete removal of all existing caulk
-
Mold treatment and thorough surface preparation
-
Minor grout repairs before sealing
-
Installation of premium mildew‑resistant bathroom silicone
Final price: Approximately $400–$550
Time required: About 4–6 hours spread over two visits to allow proper drying and curing
Lesson for homeowners:
Many people assume discoloration is only a cosmetic issue. By the time mold becomes visible on the surface, moisture may already be trapped behind the caulk. Replacing failing caulk early is usually much cheaper than waiting until grout or wall materials are affected.
Case Study #2: Detached Home in Clarkson – Main‑Floor Perimeter Sealing
Property type: Detached home in Clarkson
Job scope: Caulking around main‑floor windows, exterior door trim, interior baseboards, and several transition areas
What the customer expected:
Primarily an appearance upgrade before listing the property for sale.
What we found:
-
Numerous gaps caused by seasonal movement
-
Dried and cracked caulking around several windows
-
Minor trim separation around a patio door
-
One section of exterior trim showing early signs of moisture damage
Work performed:
-
Removal of failed sections of old caulk
-
Spot repairs to damaged trim
-
Interior paintable acrylic‑latex caulk where appropriate
-
Exterior weather‑resistant sealant around windows and doors
-
Color‑matched finishing in several visible areas
Final price: Approximately $700–$1,200
Time required: Roughly 1 full working day (6–8 hours)
Lesson for homeowners:
Perimeter caulking is often viewed as cosmetic, but it can affect energy efficiency, drafts, moisture penetration, and even a home’s appearance during resale. Addressing small gaps early can help avoid more expensive trim or moisture repairs later.
My Pro Tips: What Most Homeowners (and Some Contractors) Get Wrong
From my perspective as a Mississauga handyman, the biggest misconception about caulking is that caulk fixes problems. It doesn’t. Caulk is a sealant, not a repair material. My rule is simple: repair first, seal second.
Don’t Caulk Over a Problem
One of the most common things I see is homeowners, or sometimes even contractors, putting fresh silicone over moldy, loose, or failing caulk because it looks better for a few months.
If you have:
-
Loose or cracked grout
-
Soft drywall
-
Water‑damaged trim
-
Persistent mold behind the caulk
then new caulk is only hiding the issue.
A proper job starts with removing the old material, cleaning and drying the area, fixing any underlying damage, and then applying new sealant. The preparation often takes longer than the actual caulking. I tell clients: “The best caulk in the world won’t stick to a bad surface.”
Re‑Caulk Before It Fails Completely
Most homeowners wait until the caulk looks terrible or water is already getting behind it. Instead, watch for:
-
Small cracks forming at corners
-
Caulk pulling away from tile or tubs
-
Discoloration that won’t clean off
-
Recurring mildew spots
-
Sections becoming hard, brittle, or shrinking
If you catch these signs early, a bathroom re‑caulk might be a few hundred dollars. Wait too long and you could be dealing with grout repairs, drywall replacement, or moisture damage.
For most bathrooms, I recommend inspecting caulk annually and expecting replacement every 5–10 years, depending on usage, ventilation, and product quality.
DIY Is Fine—Until Waterproofing Matters
I’m not against DIY at all. For things like:
-
Interior trim
-
Baseboards
-
Small cosmetic gaps
a careful homeowner can usually get good results.
Where people get into trouble is:
-
Showers
-
Tubs
-
Exterior windows and doors
-
Areas exposed to constant moisture
The challenge isn’t squeezing out the caulk, it’s choosing the right product, preparing the surface properly, creating a consistent bead, and ensuring the seal remains watertight for years. A messy baseboard joint is cosmetic. A failed shower joint can lead to thousands of dollars in hidden water damage.
Mississauga‑Specific Challenges
A few local factors definitely affect caulking longevity:
-
Older condo towers (especially late‑1990s to early‑2010s builds): Frequent movement and settling can cause joints to open up. Bathrooms often have limited ventilation, leading to mildew issues.
-
Seasonal expansion and contraction: Mississauga’s freeze‑thaw cycles put stress on exterior caulking around windows, doors, and siding. Small cracks can become larger over a few seasons.
-
Hard water deposits: Many homes develop mineral buildup around tubs, showers, and sinks. Those deposits need to be cleaned thoroughly before new silicone is applied or adhesion suffers.
-
High indoor humidity: Poorly ventilated bathrooms can dramatically shorten the lifespan of even premium mildew‑resistant silicone.
The three things I repeat most often are:
-
Caulk is a sealant, not a repair. Fix the surface first.
-
Replace failing caulk early, it’s much cheaper than repairing water damage later.
-
Most caulking failures are caused by poor preparation, not poor products.
If a homeowner remembers only one thing, it’s this: the lifespan of a caulking job is determined more by surface preparation and moisture control than by the brand of caulk used.
How I Position My Caulking Work (and Related Services)
I position my caulking work as prep‑focused and problem‑solving, not just “squeeze and go.” That approach tends to resonate because most homeowners are less concerned about saving $50–$100 on a caulking job than they are about avoiding leaks, mold, and having to redo the work six months later.
Since many caulking jobs uncover related issues, I naturally highlight services like:
-
Grout repair and touch‑ups
-
Drywall patching and minor water‑damage repairs
-
Trim and baseboard repairs
-
Bathroom refreshes and maintenance
-
Window and door sealing
-
General handyman services
-
Pre‑sale home touch‑ups and punch‑list work
This helps readers see me as someone who can handle the whole picture, not just the caulk line.
Not Sure If You Need New Caulk or a Repair First?
If you’re in Mississauga and wondering whether your bathroom, kitchen, windows, or trim need a simple re‑caulk or something more, you don’t have to guess.
I provide professional caulking, grout repair, drywall patching, and general handyman services throughout Mississauga and surrounding areas. Send a few photos and I’ll let you know what I recommend before you spend money on work you may not need.
Contact me for a free estimate in Mississauga and honest advice on whether your project needs a simple re‑caulk or additional repairs.
One Reply to “Professional Caulking Cost in Mississauga: 2026 Price Guide”