
14August 2026
If you’re feeling a cold draft around your doors or windows in Mississauga, you’re probably wondering whether you can handle weather stripping yourself or if it’s time to call a handyman. The short answer: most basic weather stripping jobs are DIY-friendly, but there are clear signs that tell you when a professional is the smarter choice.
As a Mississauga-based handyman who’s fixed countless drafty doors and windows, I’ve seen homeowners save money with smart DIY installs, and I’ve also seen well-intentioned projects turn into bigger repairs. Here’s how to know which category you’re in.
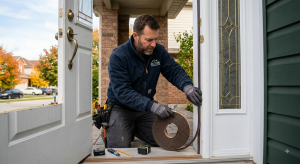
When DIY Weather Stripping Makes Sense
Weather stripping is one of the most accessible home maintenance tasks for Ontario homeowners. If your door or window is in good shape, meaning it closes, latches, and locks without resistance, and you’re simply replacing an obviously worn or cracked seal, you can absolutely do this yourself.
Common DIY-friendly scenarios include:
-
Replacing a worn door sweep on an exterior door
-
Installing adhesive foam tape around a window frame
-
Swapping out a compression seal on a patio door that still operates smoothly
-
Adding V-strip weather sealing to older windows with consistent gaps
These jobs typically cost $20–$50 in materials and take 30–60 minutes. With the right product and proper surface prep, your DIY install should last through several Ontario winters.
A Real Mississauga Case Study: When DIY Went Wrong
I recently worked on a townhouse in Mississauga where the homeowner noticed a cold draft around their back patio door. They bought adhesive foam weather stripping and installed it around the frame, but the door became difficult to close and latch. They kept trimming and repositioning the material, but parts started peeling away, and the draft persisted.
When I inspected it, the weather stripping wasn’t the real problem. The door had a slight alignment issue, so the gap wasn’t consistent around the frame. The homeowner was trying to solve an alignment problem by adding more sealing material.
I removed the failed stripping, adjusted the rollers and alignment, cleaned the frame properly, and installed the correct compression seal. Once the door was aligned, the new weather stripping made proper contact without requiring the homeowner to force the door closed.
The lesson? Don’t assume a draft automatically means you need more weather stripping. First, find out where the air is getting through and check whether the door or window is sitting correctly.
Common DIY Weather Stripping Mistakes to Avoid
From my experience, most DIY weather stripping failures come down to a few repeat mistakes:
-
Using weather stripping that’s too thick – This makes the door difficult to close or latch, and the seal gets crushed.
-
Installing over a dirty or damp surface – Adhesive-backed products may look fine initially but start peeling when temperatures change.
-
Not checking the entire door or window first – Sometimes the draft is coming from a gap caused by a sagging door, loose hinges, or a damaged frame—not the weather stripping itself.
-
Layering new material over old material – This can create too much compression and prevent the door from closing properly.
-
Using the same product everywhere – A door sweep, compression seal, V-strip, and foam tape all have different applications.
-
Ignoring the corners – Poorly fitted corners can leave small gaps that become very noticeable once the winter wind starts blowing.
My Top 3 Tips for a DIY Job That Lasts Through a Mississauga Winter
If you’re going the DIY route, here’s how to make sure your weather stripping holds up:
-
Diagnose before you buy – Close the door or window and check exactly where the air is getting through. Look for daylight, feel for drafts, and check whether the seal is actually making contact. If the door is already difficult to close, fix the alignment before adding thicker weather stripping.
-
Prepare the surface properly – Remove the old material, clean away dirt and adhesive residue, and make sure everything is completely dry before installing the new seal. This is especially important with adhesive-backed products because winter temperature swings can expose a weak bond very quickly.
-
Don’t over-compress the seal – You want a consistent, gentle seal when the door closes—not something that requires you to lean on the door or slam it. I always test the door several times after installation to make sure it closes, latches, and locks normally.
My biggest Mississauga-specific tip: don’t wait until the first really cold week to discover a problem. I recommend checking doors and windows in early fall, before the heating season gets going. A $20–$50 weather-stripping repair is much easier to deal with in October than discovering a major draft in the middle of a January cold snap.
Best Weather Stripping Products for Ontario Homes (and Which to Avoid)
For most Ontario homeowners, I recommend keeping DIY weather stripping simple. Here’s what I typically suggest:
-
Rubber or silicone compression seals – These hold up well through Ontario’s temperature swings and are more durable than inexpensive foam products.
-
Door sweeps – Essential for exterior doors, especially if you notice air coming in under the door.
-
Closed-cell foam tape – Works well for small gaps around windows or doors, provided the surface is clean and the correct thickness is used.
-
V-strip or tension-seal weather stripping – Great for older windows and doors where you need a low-profile seal rather than a bulky piece of foam.
When it comes to brands, I don’t think the brand name is as important as buying a product designed for exterior use and choosing the correct profile and size. I’ve had good results with products from established manufacturers such as Frost King, M-D Building Products, and 3M, but I always match the product to the actual door or window rather than automatically choosing a particular brand.
Products I Advise Against for DIY
I’m more cautious about recommending these for DIY installation:
-
Heavy-duty kerf-in weather stripping
-
Adjustable door bottoms
-
Concealed systems
-
Anything requiring routing, cutting into the frame, or modifying the door
Those installations need to be measured very accurately. If you get the position wrong, you can create a door that doesn’t close properly or damage the frame.
I’d also be careful with very cheap adhesive foam. It’s fine for a temporary fix or a small interior application, but I wouldn’t rely on the cheapest tape as my primary defence against a Mississauga winter. Temperature changes, moisture, and repeated opening and closing can cause inexpensive adhesive products to shrink, peel, or lose their shape.
My general rule is:
-
DIY: simple foam tape, V-strip, replacement compression seals, and basic door sweeps
-
Call a pro: anything involving door alignment, kerf installation, routing, damaged frames, uneven gaps, rot, or a door that already doesn’t close and latch properly
For an Ontario winter, I’d rather see a homeowner spend a little more on the right rubber/silicone seal and proper installation than buy the cheapest weather stripping available and have to replace it again next year.
When to Call a Professional Handyman
It’s time to call a professional when the problem appears to be more than just worn weather stripping. Here are the signs I look for:
-
The door is difficult to close, latch, or lock
-
There are uneven gaps around the door or window
-
You can see daylight even after replacing the seal
-
The door is sagging or rubbing against the frame
-
The existing weather stripping keeps coming loose or getting damaged
-
There is water staining, rot, swelling, or deterioration around the frame
-
A draft is coming from an area that isn’t accessible with simple weather stripping
-
The homeowner has already tried replacing the seal and the problem hasn’t improved
What to Expect from a Pro Visit
A professional visit should start with diagnosis rather than immediately installing new material. Here’s what I typically do:
-
Check the condition and alignment of the door or window
-
Inspect the existing seals and look for visible gaps
-
Test where air is getting through
-
Check hinges, the latch area, the threshold, and the frame
If the problem really is just worn weather stripping, I’ll remove the old material, clean and prepare the surface, install the correct replacement, and test the door or window afterward. If the gap is caused by alignment, loose hardware, or a damaged frame, I’ll address that first rather than simply putting a bigger piece of weather stripping on it.
I also like to test the finished job by opening, closing, and locking the door several times. The seal should make good contact without making the door difficult to operate.
The biggest advantage of hiring a handyman isn’t simply having someone install a strip of rubber or foam. It’s having someone determine why the draft is there in the first place. In Mississauga, where doors and frames can move slightly with seasonal temperature and humidity changes, that distinction can make the difference between a repair that lasts for years and one that needs to be redone next winter.
Final Verdict: DIY or Pro?
If you’re fighting the door to close it, you’ve replaced the weather stripping and still have a draft, or you see damage around the frame, that’s when I’d stop experimenting and call a professional.
But if your door or window is in good shape and you’re just replacing an obviously worn seal, DIY is perfectly reasonable. Just remember: a five-minute inspection before buying materials can save you from turning a $30 weather-stripping job into a much bigger repair.
Need a second opinion or a quick assessment? I’m happy to take a look and let you know whether it’s a simple DIY fix or something that needs a pro touch.